Tuesday, May 1, 2012

The Color My World Challenge- Conclusions And Link Party

Well the challenge is over.  I didn't finish my laundry room, but I got a hell of a start.  I'd like to thank Jessamie and Suzy for putting this together.  Without this push the room would probably still be a shell of a room.

So, now to recap what I did.  I decided to do my new laundry room in black and white...and I love it!  Here's how it started.


And here it is now (so far).


We painted the walls in black and white horizontal stripes and put in black porcelain tile.  My husband made a table (franken-table) for the farm sink to sit on which I think turned out really nicely.  Originally I was thinking about doing a sink skirt, but the sink actually looks too nice now to cover it.  Props to the hubs.

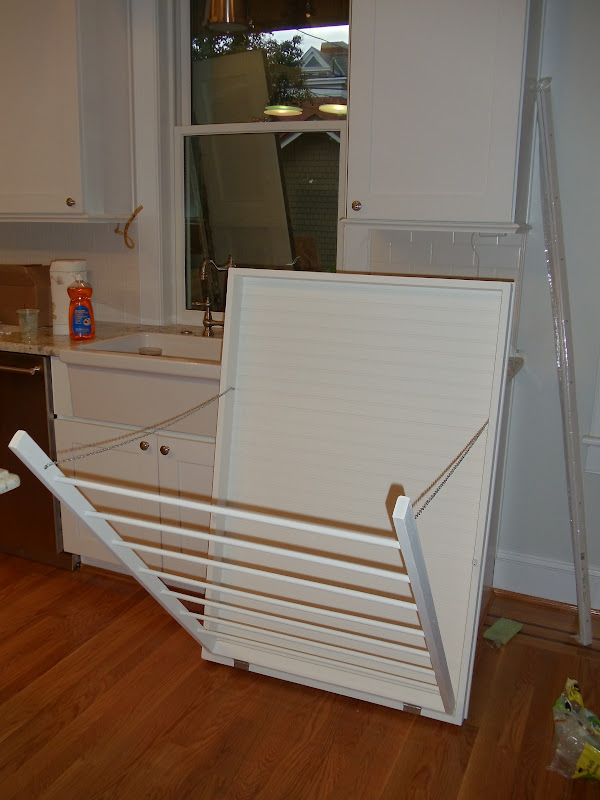
He also made this drying rack.  


I made a laundry rules sign that I put over the window (which still hasn't been painted!).  The pendant is new.  I'm a bit disappointed with it though or with how it was shipped I should say.  I bought it over a year ago at One King's Lane and it didn't come with the crystal bit that hangs down.  It also doesn't look quite like the picture when I bought it.  Unfortunately I found this out a year too late.  Oh well, I still like it though.


So now we just need our washing machine/dryer to be delivered, a window treatment ( I decided on the toile with a green grosgrain ribbon trim), countertop, upper cabinets etc.  A nice list remains but I'm loving my black and white laundry room.  

Now it's time to link up.  If you've incorporated a new color into one of your rooms link up your pictures...I'd love to see them! You can link up to any of the challenger's blog posts and they will appear on all of our blogs.  We'll be picking and posting about our faves next week!

 And, don't forget to check out everyone's recap on how they used/liked their new colors.

Ange - The Blooming Hydrangea
Anna - A Newfound Treasure
Carmel - Our 5th House
Cassie - Primitive and Proper
Jadyn - Dutch.British.Love
Jessamie - Bird and Branch Redesign
Julia - Black Tag Diaries
Julia - Pawley's Island Posh
Kristy - Hyphen Interiors
Lisa - Shine Your Light
Lisa - Trapped in North Jersey
Maury - Life on Mars
Shaunna - Perfectly Imperfect
Shelley - Crazy Wonderful
Suzy - Saved by Suzy
Tiffany - Living Savvy
Vashti & Jamie - Like me Some...



Thursday, April 26, 2012

The "Plus One" Post (Where My Husband Weighs In)

Jessamie over at Bird and Branch Redesign has come up with a fun link party involving... wait for it...our husbands' opinions.  We're supposed to show some pretty design pictures and have our significant others weigh in with their thoughts of the rooms.  Brace yourselves.  My husband has zero filter.  I've learned to embrace it, but it can be a bit disconcerting if you're not used to it.  So here goes. 


Source: google.com via Tiffany on Pinterest


Too much going on.  Epic fail.  I imagine the person that lives in this bedroom to love all things Paris Hilton and bought all their furniture at multiple drag queen estate sales.  The combination of the Charlie Brown floor, pink curved headboard and faux fur rocked me between nausea and a small seizure.  The window looks like it could be nice, some of the art pieces look interesting and the black chair is ok.    


I like the ceiling and the wood floor.  The zebra print rug is just a time bomb waiting for its first wine stain explosion.  Chairs look stiff and uncomfortable and any skin that comes in contact with them would stick or start sweating instantly.


This isn't bad.  The wall covering is nice and the colors are soothing-like a bedroom should be.  I don't understand the logs in the fireplace.  Fix that sucker and make it work.  The chandelier looks a bit like a daddy long leg spider.


Soothing colors, warm floors and chunky crown molding.  Good start.  I think I would step on those curtains and pull them down eventually. I get the pooling thing, but only for windows that you don't step around.  I see these coming down on me in the middle of the night when I try to sneak off to pee.


Jesus, a naked dude and half naked girl smoking a cigarette.  Really?  Don't like the color combo or the patterns.


Love the crown, doors, ceiling, moldings and floor.  The yellow couch, cat and zebra print I can live without.  I don't mind the black chairs.  


This bookcase rocks albeit a bit impractical.   Not sure how you get to them, but it looks cool.


Cool kitchen.  Not a fan of gold color of the knobs but the hardware (minus the color) is pretty cool too.  I am not neat enough to have open shelving.


I like this kitchen.  Marble back splash is nice looking...

Source: bing.com via Tiffany on Pinterest

I think I was in this VIP suite in NYC once with Ludacris.  Just kidding. I actually like this.

And there you have it.  Thanks to the hubs for participating and toning it down.  I was a little worried about what he was going to write but I think it was pretty PG which is good.  It's always fun to ignore see a man's perspective of things.  They really are different creatures aren't they?  God love em' though.


Tuesday, April 24, 2012

The Color My World Challenge Week 4-Fabric (Fail)


Well it's week 4 of the Color My World Challenge where we're supposed to incorporate our color into a room in the form of fabric.  I was doing so well with this challenge, and then it happened.  My business trip to Boston and my legendary indecisiveness got the better of me.  I need a window covering (fabric), possibly a sink skirt (fabric) and if I'm feeling ambitious, an ironing board cover (fabric).  Unfortunately, I didn't have time to tackle any of this, not that it mattered since I haven't even picked a fabric yet.  At first I was thinking black and white fabric like this.


Source: joann.com via Tiffany on Pinterest


.And then I tried this


I love this one.  Sorry for the picture but the room is already a bit dark and there's no electricity yet and on top of that it was a cloudy day...the terrible picture taking trifecta!

I may end up with the above fabric, but then I went in the room today and it just felt like it was in need of some color (it would still mainly be black and white, but it's looking a bit stark without a much needed punch of something).  Specifically the color green.

Source: fabric.com via Tiffany on Pinterest


Source: fabric.com via Tiffany on Pinterest


Actually I think a floral would be better so it's not so geometric with geometric.  So, I'm back to square one...maybe.  I could stick with black and white and just do some storage boxes in green, or I could do green fabric or maybe even a green backsplash (if that's even the route we're going).  Not even sure what color green I like...Kelly, Chartreuse, Apple?  I love green, but not usually in home decor so this is like a challenge within a challenge.  I'd better come up with something quick though since I'd really like to finish the challenge and the room;)  What do you think?

I hope my fellow bloggers had better luck with their fabric challenge (I'm sure they did!).  Make sure to check them out.

Ange - The Blooming Hydrangea
Anna - A Newfound Treasure
Carmel - Our 5th House
Cassie - Primitive and Proper
Jadyn - Dutch.British.Love
Jessamie - Bird and Branch Redesign
Julia - Black Tag Diaries
Julia - Pawley's Island Posh
Kristy - Hyphen Interiors
Lisa - Shine Your Light
Lisa - Trapped in North Jersey
Maury - Life on Mars
Shaunna - Perfectly Imperfect
Shelley - Crazy Wonderful
Suzy - Saved by Suzy
Tiffany - Living Savvy
Vashti & Jamie - Like me Some...

Tuesday, April 17, 2012

The Color My World Challenge Week 3-Paint

This week is the paint portion of the challenge.  We're supposed to add our color to either walls, furniture, or whatever we want.  Of course it only made sense to paint the walls since all we had up was drywall.  I wanted to do something special in here since it's a small room.  Might as well go nuts.  Very few people are going to see this room so I can just go crazy with it.  I won't spoil the surprise with any hints.  Here it is.


In keeping with the black and white theme we decided to go with horizontal stripes (ignore the window that has yet to be repaired/painted). I wanted the black stripe to be less prominent than the white because I thought maybe equal stripes would be too overwhelming.  We followed the tutorial by Songbird.  She offers lots of tips and tricks for making flawless stripes.  She also shows some of the mistakes which we were able to learn from.  My favorite tip was to paint over the tape in your base color before you paint the stripe so that it fills in any gaps between the tape and the wall.  This was a lifesaver.  The lines turned out really crisp with only a couple of places that the paint bled.  I still have to go back for a couple of touch-ups but wanted to show you the room's progress.  I'm loving the way the room is coming together so far.  

 I'm going out of town this week for a conference and I doubt I'll get my next project (fabric) done in time, but we'll see.  Anyway, make sure to check out how all of the other ladies incorporated their colors.


Ange - The Blooming Hydrangea
Anna - A Newfound Treasure
Carmel - Our 5th House
Cassie - Primitive and Proper
Jadyn - Dutch.British.Love
Jessamie - Bird and Branch Redesign
Julia - Black Tag Diaries
Julia - Pawley's Island Posh
Kristy - Hyphen Interiors
Lisa - Shine Your Light
Lisa - Trapped in North Jersey
Maury - Life on Mars
Shaunna - Perfectly Imperfect
Shelley - Crazy Wonderful
Suzy - Saved by Suzy
Tiffany - Living Savvy
Vashti & Jamie - Like me Some...

Monday, April 16, 2012

I'm In Love...With A Fabric

I was out looking for the laundry room fabric when I saw this and stopped in my tracks.


Honestly, it's way prettier in person.  Really colorful and so spring-y!  It just makes me happy to look at it.  It's  by Kaufman, so not outrageously expensive.  I think it would be perfect for my daughter's room or playroom.  So, I'll just add it to my list of never ending things to buy.  It's going right behind the family room and kitchen fabric that I have yet to order.  My credit card is already screaming out in pain;)

Thursday, April 12, 2012

DIY Laundry Drying Rack

So originally I was going to just buy this drying rack from Ballard Designs.


But...it is pretty pricey at $199 not including tax and shipping.  Ouch!  So I looked around the web and found some DIY options that I thought looked great, like Centsational Girl's take on it, or the one that Embellished Bayou did.  I asked my husband if he thought he could tackle it.  He was reluctant at first, just because he already has a million projects that need to be done around the house, but then he had a change of heart and was off to Lowe's.

So here's the materials list.
- (2) 1 X 3 X 8 pieces of wood
- (1) 1 X 2 X 8 piece of poplar (that we had laying around)
- (7) 1/2 inch dowels
- wood beadboard 32 X 48
- (2) small hinges
- chain
-hanging hardware
-finish nails
-wood glue

First a picture frame was made with the 1 X 3 X 8 wood using finish nails and wood glue.


The beadboard was then nailed/glued to the back of the frame.  We put the beadboard on the horizontal instead of the vertical for a reason which will be unveiled next week.  Am I being mysterious enough?


Then the 1 X 2 X 8's were cut to fit inside the box.  They were laid next to each other and measured so that each dowel rod would be equidistant.  For example, we have 7 dowel rods so he divided the total length by the number of dowel holes needed which is 7.  Using a drill bit of the same size as the dowel, drill the holes for the dowels.  We (and by we I mean he) used a piece of blue painters tape so they would all be the same depth.  Put some glue in the holes and press the dowels into the holes made.  It can be a bit tricky pushing the dowels all together, but if you alternate the dowels on each board it makes it easier to push them together.  You can shoot a nail through the side pieces into the end of the dowel for extra security but it isn't necessary if you use enough glue.


Make sure the length of the dowels plus the outer wood pieces fit nicely in the box you made.


Trim the outer edge of the box to hide the edge of the beadboard.  We had some trim laying around that we were able to use.  Then paint everything. After everything is painted with several coats, assemble the two pieces together using small hinges.


Use a chain, piece of nylon or toy box hinge to allow the doweled piece to come down so that clothes can hang freely.  We used chain so the piece can hang down farther than others I have seen (and allow us to reach the top dowel easily since it's a bit tall).


To keep the piece together when not in use, we used clips used to hold storm windows or screens in place


Please excuse all the mess and clutter in the background.  My husband is horrified that I took these pictures without tidying up.  Whatever.

So what do you think?  It cost us around $50 to do.  A little more than what the other ladies spent, but it's quite large.  Definitely less than it would have cost to buy.  Overall I'm very happy with it.  I just can't wait to put it up in the laundry room and see how it looks!


Wednesday, April 11, 2012

2nd Floor Bath Progress-Tile

Well after the inevitable delays and reordering of some tile, the second floor bath is back on track.  The tile was just finished yesterday.


Next up is paint and board and batten.  Will it ever end?  My poor husband is up to his ears in projects around the house, especially since I've asked him to help me with the Color My World Challenge (hee-hee).  

Oh, and an update on the powder room stencil.  It sucks a big fat one.  Sorry, but it does.  The smallest room in the house is probably going to take me the longest.  I've almost given up so many times but I've come this far.  I WILL finish it...just not this week.

Any projects that are making you want to pull out every hair on your head or am I the only one?